
Mastering the Leading Fundamentals: A Step-by-Step Guide for Safe, Effective Horse Handling
- Loz
- Aug 13, 2025
- 9 min read
Updated: Aug 18, 2025

Essential Techniques, Red Flags, and Recommended Gear for Handlers
Leading a horse confidently and correctly is one of the most important skills any owner, trainer, or handler can develop. Not only does solid leading lay the groundwork for all other training, but it’s also vital for safety—your own and your horse’s. This comprehensive guide covers the key fundamentals of leading, how to spot and address poor behaviour, step-by-step instructions, and the equipment and safety gear you’ll need for successful sessions.
Why Leading Fundamentals Matter
Leading is more than just walking a horse from point A to point B. It’s about building trust, establishing boundaries, and ensuring both horse and handler remain calm and safe in every situation—whether at the paddock, stable, or during transport. A well-led horse is responsive, attentive, and less likely to spook or bolt, making every interaction safer and more enjoyable.
The Fundamentals of Good Leading
Let’s break down the essential skills your horse needs for effective leading:
Halt: Your horse should stop with you, not drag ahead or lag behind. The cue should be clear and consistent, whether it’s a verbal “aaaand halt”, a gentle pressure on the rope, or a shift in your body language.
Forward: A light cue should be all it takes for your horse to step forward. If you have to pull or drag, there’s groundwork to do (such as using the whip by stirring it - it should not touch on the horse's body), to increase awareness that you are asking your horse to "answer the question" to your cue with a little more haste.
Turning (Left and Right): Your horse should yield their shoulders and follow your direction without crowding you or swinging their hind end into your space.
Backing Up: Your horse should take a step or two backwards when asked, without resistance or confusion.
These aren’t just fancy tricks—they’re the foundation for trust and communication. A horse that understands these cues will be much less likely to balk at the float, rush the ramp, walk over you or shy into you, or panic once inside the float too.
Getting Leading Right: The Details
Consistency and clarity are key. Use the same cues every time and ensure your body language matches your intention. For example:
Position yourself at the horse’s shoulder, not in front where you can be trampled if things go pear-shaped.
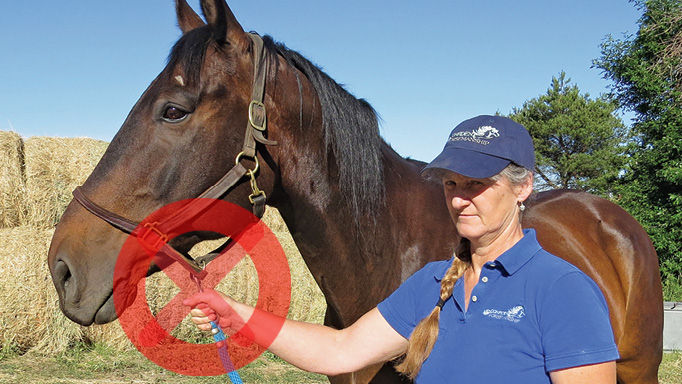
Hold the lead rope with slack, allowing the horse to follow a feel rather than being physically dragged. Avoid gripping right up at the halter—this is a big red flag and often leads to a tense, reactive horse.
Reward the right response immediately, whether it’s a soft word, a scratch, a gentle slow stroke over one of their eyes, or a release of pressure. Timing is everything. I try to avoid patting the horse.
So make sure you have some little, healthy treats for your training session, and spend time practising in different environments too!
🚩 Red Flags: Signs of Poor Leading Practice - Horse & Handler
Here are some common warning signs that your leading technique might be needing a check-up:
Handler Errors: Inconsistent cues, pulling or yanking the lead, walking too fast, holding the lead rope right up near the halter, or lacking awareness of the horse’s body language can all contribute to poor leading.
Lack of Attention: Both horse and handler should be tuned in—watch for ears pinned back, tail swishing, or a handler distracted by their phone or surroundings.
Your horse gets fixated or hard stares at something (other than you) for longer that 3 seconds, freezing to assess what might be a threat to their safety
It's OK if they look softly at their surroundings, but this fixation or freezing is an escalation to threat fight/flight behaviour (such as kicking/bolting etc.)
Pushing or Crowding: A horse that bumps, leans, crowds or shoulders into you, or tries to walk ahead, is ignoring your space and cues.
Dragging or Lagging: Horses that drag behind, plant their feet, create constant tension in the lead rope, or refuse to move are displaying resistance or discomfort.
Surging Ahead: Horses that get their shoulder ahead of your body position is extremely dangerous (as you are entering the kicking zone and out of their closer, more attentive, line-of-sight). This will go hand-in-hand with "Lack of Attention"
Be aware the when the horses shoulder gets in front of you this is a major safety issue (read my post on leading multiple horses where I un-pack this further)
Sudden Stops or Starts: Abrupt movements can indicate anxiety, confusion, or lack of clear direction.
Sudden Swivels or Escalations: Abrupt swing of the hindquarters towards you (think the horse is about to kick me!), frequent use of force, dragging, or escalating pressure to get a response.
Confusion: The horse does not clearly respond or gets anxious when you ask for basic leading aids/cues.
Nagging: Your horse repeatedly encroaches on your space, requiring you to continually remind it, almost like nagging repeatedly without any change in its behavior.
Essential Equipment for Leading


Item | Details & Tips |
Lead Rope | Choose a sturdy rope, ideally 2–3 metres long, for enough control without excess slack. Tip: If the horse is having troubles, I suggest the use of the longer lead rope 8-12 metres. |
Rope Halter | Opt for a halter made of soft rope—avoid buckles or snaps, which can break or injure. Ensure it fits snugly and sits high on the nose. |
Flag and/or Whip | Useful for clear directional signals or reinforcing boundaries. Always use gently, never as punishment. |
Handler Safety Gear | Wear an approved helmet, strong gloves, and sturdy boots with closed toes for protection (please don't use steel cap boots as toes can get "sliced off" with these types). |
Step-by-Step Guide to Leading Fundamentals
General Principles
Always start in a quiet, safe area with minimal distractions.
Stand at the horse’s shoulder, facing forward, with the lead rope held in a loose but secure grip.
Keep your movements deliberate and slow—rushing leads to confusion and mistakes.
Give your horse at least 3 seconds (think slowly one-one thousand, two-one thousand, three-one thousand) to respond to a cue (this is the scientific processing time that horses take to respond to stimuli)

1. Stop
Walk forward together, then gently exhale and slow your pace.
Say “whoa” or your chosen cue while bringing your energy down.
If needed, give a slight downward pressure on the lead rope until the horse halts and stands quietly beside you.
2. Back
Face the horse, stand tall, and step towards their space, indicating you want them to move back.
Wiggle the lead rope lightly if there’s no response, increasing pressure only as much as needed.
Release pressure and praise as soon as the horse takes even one step back.
3. Forward
Face the direction you want to go, look ahead, and take the first step confidently.
Gently lift the lead rope forward, applying soft pressure if the horse hesitates.
Reward forward movement by relaxing the rope and using a calm voice.
4. Turn Left
Step slightly to the left and guide the horse’s head with the lead rope in that direction.
Your body should lead the movement—step away from the horse’s body to give them space to follow.
5. Turn Right
Step towards the horse’s shoulder, gently guiding their head to the right with the lead rope.
Give clear, slow cues, and allow the horse time to process the movement.
6. Check Your Safety Bubble/Boundary
Step towards the horse’s shoulder, gently guiding their head to the right with the lead rope.
Give clear, slow cues, and allow the horse time to process the movement.
Cue/Aid Escalation for a Responsive Horse
You may find that during your training sessions with your horse, they may not respond actively or quite delayed. Some people may term this horse "dull to the aids". If you think your horse needs to be more responsive when training better leading, you can definitely work on getting your horse to respond to the lightest of aids. I recommend my escalation approach, where timing is everything, using a 3-second rule:
1. Ask with your body or voice
If you need a heightened response to a cue (such as walk on from a halt but the horse is slow), you can lift your energy to your chest at a standstill, then say in a higher tone "walk on".
2. Ask with the rope aid
If the horse does not respond to step one, then move to a feel on the rope. So ask with a soft feel on the lead rope (in the direction you want the horse to go).
3. Ask with the flag/whip
If step 2 does not work, move to the strongest request (without abusing/hitting the horse of course), either loudly thump your leg/chest or use the flag to bump against your leg or use the whip to make a noise by whacking the ground next to you, for creating a sharp awareness. This noise should mean, "I'm here and what I asked you means something, respond now!" Again you are not physically touching/hitting/whipping your horse for this part.
Understand that when you are learning this process, it might not be as quickly done in 3-seconds. Be kind to yourself, you are learning too! You don't want it to drag on and take too long as this may confuse the horse as you might reward the release at the wrong time. (Let me know in the comments, if you'd like a video of this process and I can add one in.)
Once you and the horse are well-practiced, you will find they will respond to the slightest of cues from step 1. Go you!
Influencing Hoof Placement: Shaping the Swing Phase
The “swing phase” is when the horse lifts and moves a hoof forward. Skilled handlers can influence where and how the hoof lands, which is crucial for teaching balance and lengthening or shortening the stride.
To Shorten the Step: As the horse picks up a hoof, use gentle, consistent pressure on the lead to encourage a smaller, more precise placement. Time your cue as the hoof is about to land.
To Lengthen the Step: Soften the lead pressure and encourage more forward energy with your body and voice (you may need to stir the whip/flag if the horse requires added energy), allowing the horse to swing the leg further. You can also step out a little further yourself, inviting the horse to match your stride.
Always reward the horse immediately when they respond (even the smallest attempt) and keep movements slow and controlled for the best results.

Recommended Training Session Duration
For most horses, 10–20 minutes of focused leading practice is ideal, especially when introducing new concepts. Signs that a session should end include:
The horse is consistently relaxed and responsive to your clear leading cues.
Attention starts to wane or the horse becomes fidgety or stressed.
You’ve achieved your key goal for the session.
Always finish on a positive note, even if it’s a small win. Consistency and short, regular sessions tend to produce far better results than infrequent, lengthy ones.
Importance of Consistent Reinforcement in Leading Skills
It is a common misconception that once a horse learns a particular skill or behavior, it will retain that knowledge indefinitely. However, maintaining safe and positive leading behaviors requires ongoing reinforcement and practice. Here are some key reasons why consistent reinforcement is essential:
1. Memory and Retention
Horses, like all animals, can forget learned behaviors over time, especially if those behaviors are not regularly practiced. Consistent reinforcement helps to solidify the skills in the horse's memory, making it more likely that they will recall and perform them correctly in the future.
2. Behavioral Consistency
Just as humans need reminders and practice to maintain skills, horses benefit from regular reinforcement of leading behaviors. This consistency helps to ensure that the horse understands what is expected of them and reduces the likelihood of reverting to undesirable behaviors.
3. Building Trust and Confidence
Regularly reinforcing leading skills fosters a positive relationship between the horse and handler. This ongoing interaction builds trust and confidence, making the horse more willing to follow and respond to cues. A horse that feels secure in its leading skills is less likely to exhibit anxiety or resistance.
4. Adapting to Changes
Horses can be sensitive to changes in their environment, routine, or handler. Regular reinforcement of leading skills allows the horse to adapt to these changes more effectively. It ensures that the horse remains responsive and attentive, even when faced with new situations or challenges.
5. Prevention of Behavioral Issues
Neglecting to reinforce leading skills can lead to the development of undesirable behaviors, such as pulling, rushing, or becoming uncooperative. By consistently practicing and reinforcing positive leading behaviors, handlers can prevent these issues from arising and ensure a safer experience for both the horse and the handler.
Conclusion: Consistency and Confidence Build Great Leaders
In conclusion, teaching a horse to lead safely and positively is an ongoing process that extends beyond simply learning the behavior. Regular reinforcement is essential for maintaining these skills, fostering trust, and adapting to changes, ultimately resulting in a harmonious and secure relationship between horse and handler.
Mastering the basics of leading is not just about relocating your horse; it's about establishing the foundation for every interaction. By recognizing warning signs, practicing slow and deliberate steps, and using appropriate equipment, you can develop a safer and more rewarding partnership with your horse. Focus on brief, positive sessions, and always prioritize safety and clear communication. With patience and consistency, you and your horse will move forward confidently.

Comments