
Leading More than One Horse
- Loz
- Jul 14, 2025
- 9 min read
Updated: Aug 18, 2025
Are you ever in a situation where you have to lead more than one horse on the ground?
It can be quite nerve wracking when you need to do something like this or have never done it before. So here are some little tips on maximising you and your horse's safety.
Just remember this takes time to learn so don't beat yourself up for fumbling/dropping ropes, flags and it not being perfect! It is a journey! Have fun and be safe! This post is to help you as a person, single-handedly handle this (so you can do this all on your own). This is my tried, tested and proven methods I am sharing with you.
There are 4 phases.
PHASE 1 - SINGLE HORSE CHECKLIST
Try and ensure you can dedicate some time to instill expected horse behaviours one-on-one. I understand this may not be possible in every situation.
If you have time, ensure you have engrained the correct leading behaviours for each horse individually. Can they confidently do:
Halt
Walk on from gentle lead rope pressure, after you have started walking (or if you ask whilst standing still too)
When halted/stopped, can they do so without fidgeting
If they get distracted, can you quickly get them to focus back on you (make sure you take a deep breath - count to 3 - and stay grounded here, try to lessen your worry/anxiety so your emotions stay in check)
From a rope ask them to step left or right (or away or towards you)
Can the horse bum yield to rope pressure on both sides (you ask them to stand, walk to a position behind the horse, pick up the rope and walk backwards from them - they should then turn to follow you and walk towards you until you cue them to halt)
Back away from you both standing next to them on both sides (in the usual leading position) and in front of them
Are there any parts of the body the horse is not comfortable with you touching/being around (pay attention to this)
Practice going through a gate, you walk through, the horse stays halted, then you gently ask with voice and rope cues to slowly walk through the gate and turn to face the gate (if they are rushing, ask them to step back and start this process again, only getting the horse to move one foot at a time (halting in between in foot) as this teaches them not to rush)
Can you get the horse to walk backwards through the gate one foot at a time, and slowly?
This also benefits you when it comes to float loading!
PHASE 2 - INTRODUCTION BEHVIOURS
Once each horse can confidently do the above (and you can too), you can them introduce a second horse. Make sure you allow the horses to introduce one another in a safe space. You need to notice what they will do to one another - is there squealing, kicking, ears pinning? Make a mental note of this, and if needed intervene if the behaviour starts to escalate. If there are some "not-so-great" behaviours, you will need to work on this. I generally will introduce a flag (here are the ones I use) so that the horses will then have awareness of you and shift their focus away from one another. This also helps instill safe, respectful behaviour between horses and humans.
Key things to note here:
Which horse is the more dominant/submissive
Which is calmer/more anxious
What behaviours does each horse express
How reactive is each horse
What is each horse's "bubble" (i.e. with the more dominant one, you may see ears pinned when a horse is at the edge of their invisible comfort barrier/bubble)... note roughly how many meters this is per horse
What are there go-to reactions (i.e. pinned ears, kicking, licking/chewing etc. and what behaviours or things occurred prior to this reaction)
PHASE 3 - LEADING TWO HORSES
I will ensure I have my trusty flag with me for this part. Ensure your horse is calm and relaxed with a flag before this phase.
In a decent open area, such as a round yard, arena or area with space for horses to move and tie up areas), lead one horse in and safely tie up (I generally take the more dominant/calm horse first)
Bring in the second horse and tie up near to the first horse, but not close enough they can kick/touch/react to one another
Have your trusty flag in one hand, and un-tie/walk with first horse
Approach your second horse on their left-hand side (you may need to ensure their bum is against the side of a round yard/arena for this so you can quickly and safely handle any "bubble" reactions), ensuring you keep your first horse on your left-hand side, and slowly approach
Give gentle/positive reinforcements to both horses during this process
Ensure you de-escalate any unwarranted/negative behaviours (you may need to go back to Phase 1 if this occurs, and work with the second horse tied up -close by but not interacting during this time)
Un-tie the second horse, and stand for a moment, gently brushing each horses favourite scratchy spot (usually head or wither or shoulder)
Great time to give them a treat such as a Hygain Smoochie as you want them to share a positive experience together
Take a minute to talk to them about how lovely it is to be sharing this with them, focus on breathing deeply and calmly as they will be feeding off your energy at this point
Position both horses with their heads facing in towards you and their bums further away along the edge of the round yard/arena (there should be around 1.5-2m between each horse's head and enough room so that you could imaginatively walk straight between the two horses if there was no fencing there)
Take your time here and use your flag as an extension of your arm as you should be able to do this without moving your own feet
Once the horses are in this safe position, ensure your flag is in your writing hand, you are going to start walking backwards slowly
The horses will only move when they feel the rope pressure on their halters
Ensure you de-escalate any unwanted behaviours and reset this position if that happens (from step 7)
Aim for 3-8 steps of your feet so the horses end up parallel to one another and facing you
Halt as soon as the horses are parallel to one another, give vocal praise and a treat (don't pat or touch your horse at this stage as it may escalate into an unwanted behaviour that the horses mistook for one another)
Ask them to take 1-2 steps back each (if you are really good and have really mastered Phase 1 here, they should be able to do this together at the same time - something to work towards)
Use your flag to help back this up if need be
Halt them both, and positively reward them (now is the time for a little treat)
Then repeat steps 9 and 10, three more times
If there are no unwanted/de-escalation behaviours, you can now slowly turn to face away from the horses, and repeat steps 9 to 11
This is the basic start. Repeat this phase often. Remember it takes 10,000 repetitions for it to become a habit! You should be able to advance to walking, turning them left and right and backing up.

PHASE 4 - LEADING TWO HORSES THROUGH A GATE
I will ensure I have my trusty flag with me for this part (just in case). Ensure your horse is calm and relaxed with a flag before this phase.

After mastering phase 3, you should be ready to tackle getting two horses through a gate (or tight space)?!
Find a horse-friendly gate to practice this with (and maybe even check if you have electric fencing here to turn it off to increase safety)
Have your two horses in your halters with long lead ropes (I'm talking 8m+) and your flag with you
Lead them both up to a gate
You can prepare this earlier, by opening it fully if you like, however, most gates you come across will be shut so practicing the opening and closing with multiple horses is key
Put both lead ropes in one hand, and open the gate
From Phase 1, step 9, you are going to walk through the gate first
Ensure you don't accidentally put pressure on the rope/or send the walk on cue, so lengthen your lead ropes enough here (your horses should stay put here)
Use the flag to de-escalate any unwanted responses/behaviours
Position yourself on the other side of the gate (where the horses will end up), right next to the post
Ask your dominant/calm horse to calmly and slowly walk through one step at a time (and halt like in Phase 1, step 9a)
Use your flag to stop any rushing or to help keep the other horse staying put
Get your first horse to then walk through and be standing still next to you at a safe distance, they should be pointed in the same direction as you - head perpendicular to the gate
Now repeat steps 6 and 7 for the second horse - they will end up next to the first horse facing the same way
Now you can shut the gate and, boom, practice going back through it the other way
You can advance these moves once you and your horses are confident and can take away the flag once you see the horses can calmly deal with this process. I tend to keep it for the "never say never" moments.
The reason I generally won't just open a big gate and walk both horses through is it doesn't teach calm, slow and wait. It also stops them from "running you over" or bowling into you. It increases safety for horses and humans alike! Additionally, it is the best way to handle introduction of horses into a paddock (always turning back to face the gate before even consider releasing).
#1 SAFETY TIP
When leading two or more horses, ensure that no horse's shoulder is positioned ahead of your own. This is important because being in such a position places you in the horse's kicking zone. Additionally, the horse's focus will likely shift away from you to what lies ahead in their field of vision, making it difficult for you to manage any sudden excitement or unforeseen situations effectively.

Instill leading cues in your horse using verbal commands, the rope, and then escalate quickly. In this situation, if a horse starts to get ahead, confidently and slowly say "Steaaaaadyy," and slow your body. If there's no response, use the lead rope to give the back cue. If that still doesn’t work, escalate immediately with a strong wiggle of the lead rope (think flick your wrists up and down - not side to side), ensuring it bumps under their chin vigorously to get a reaction. These steps should occur within seconds.
Practice this technique when leading each horse individually. They should always maintain some form of attention on you for your safety.
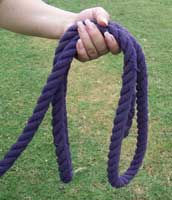
#2 SAFETY TIP
Ensure you hold your lead ropes the right way to avoid getting hands caught/dragged. Here's an excellent example:
LITTLE TIP FOR YOUNGSTERS
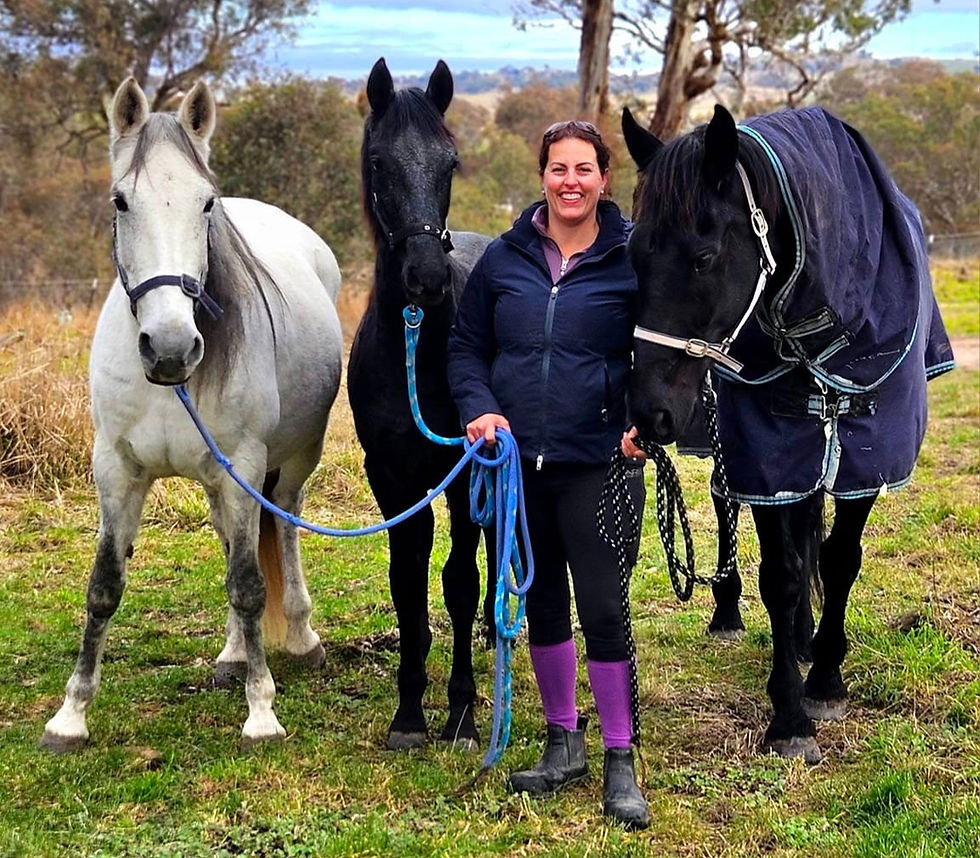
I have a youngster, so I would recommend they be placed in the middle between two older horses, so they feel calm and supported. (You can see them in the top photo in this post.)
DEALING WITH DIFFERENCES IN SPEEDS
If you notice that one horse is moving faster than another, it is important to review the leading cues established for each horse. Should one horse begin to pull ahead, apply the safety tip mentioned earlier to prevent them from advancing beyond the safe zone (the shoulder).
For a horse that is moving slower, regardless of the reason, you can encourage an increase in speed by using a verbal cue, supplemented with a rope cue. I use the verbal cue "Walk-up," delivered with an increased pitch to convey enthusiasm to the horse, while gently bumping the lead rope under their chin to prompt a forward step. This is a fundamental aspect of leading.
If the horse is slow due to medical/physical restrictions, then I would ensure the faster of the two, respects the leading cues to stay slower and steadier. Never allowing the faster horse to get past your shoulder.
To advance the leading process, you can train the horse to transition from a walk to a trot on cue. This topic will be explored further in another post. Essentially, these are foundational leading training techniques that should be practiced establishing reliable and safe leading behaviors.
FINAL THOUGHT
Start using your peripheral vision for early signs of changes in the horses you re leading (speed, position, where they are looking). It's not that you are micro-managing their every move, it teaches you the ability to react in the smallest way and de-escalate situations without waiting for major escalations and safety concerns.
Keep in mind that horses require ongoing training and cannot be trained just once. You will need to revisit their training regularly, much like how you would practice riding a bike if you haven't done it in a while, as both we and horses can become rusty. Practice makes permanent!
Consider this: Would you feel at ease allowing someone else to lead your horse(s), or would you need to explain how to handle them due to their less-than-ideal leading behaviors? Are you justifying why your horse is difficult to lead? If so, it might be time to urgently reassess their leading skills.
Be safe, have fun and enjoy the journey. Getting used to handling lots of ropes and leading multiple horses can be done! You've got this.
Let me know how you go with these exercises/tips.


Comments